Friday, 24 July 2015

How to Open a Terminal Window in Ubuntu Unity and Gnome 2

How to Open a Terminal Window in Unity

With the new desktop enviorment (Unity) in Ubuntu, you now need to take a few extra steps to open a terminal compared to Gnome 2 in the past.
 Click on the Ubuntu Icon located in the upper left corner.
Click on the Ubuntu Icon in the upper left corner. Above the Doc. (Ubuntu Unity)


In the Search box type in terminal 
Use the Ubuntu Search Bar to find the application you wish to launch.


Click on the terminal application
Search for Terminal


Launched Terminal Window in Ubuntu 11.04 with Unity Desktop
 Don't forget to take a look at Useful Linux Commands.


How to Open a Terminal Window in Gnome 2

The real power of Linux happens at the command line. As time goes on users use the terminal less and less due to the the enhancements on the graphical front ends. There are still many times having some skills with bash commands are very useful.  In this tutorials we will just cover how to launch a terminal in Gnome 2
Please check out some useful commands you can use in the terminal. 
Note: This example I am using an older version of Ubuntu but these steps should apply to any Gnome 2 Desktop with the standard launchers.
Click on Applications > Accessories > Terminal 
Click on Applications > Accessories > Terminal
Simple enough. Don't forget to check out useful terminal commands.
How To Set The root Password In Ubuntu

How To Set The root Password In Ubuntu

By default ubuntu has an unknown password set. It is very rare that you would ever need to login as root but if you do you will need to have a password set. To set the password for root it is as simple as typing in a command in a terminal / command line.
When you set the root password you will need to be logged in with a user that has sudo access. Often times the user that you created when you setup your Ubuntu system will have sudo access.
If you are setting this on a desktop computer you will need to open a terminal to issue the following command. Since the default server does not have a graphical interface you will just need to enter the command.

Let's get started. Enter the following command in a terminal or bash window.
sudo passwd root
Create a password for the root user with the following command: sudo passwd root


Enter your password (sudo user password) 
Enter the password of the user with sudo access


Create a password 
Create a password for the root user


Confirm password
Enter the password one more time to confirm it


To login and test out the new root users password, use the  su command to switch users.
su 
Enter su to switch to the super user


You can now issue commands as the root user. Just be really careful because if you make a mistake the root user will have the access to do it.
Hope you found this useful!

How To Change Password On Ubuntu From GUI

How To Change Password On Ubuntu

Answer: On Ubuntu, you can change password from either GUI or command line as explained below.

1. Ubuntu Change Password from GUI

Launch Change Password Window by clicking on “System -> Preferences -> About Me”, which will display the following window. Click on ‘Change Password’ button in this window.
Ubuntu Change Password - About Me Window
Enter Current Password: In the change password window, enter your current password and click on ‘Authenticate’.
Ubuntu Change Password - Enter Current Password
Enter New Password: Once you enter the current password, the new password text field will be enabled. Enter your new password and click on ‘Change Password’.
Ubuntu Change Password - Enter New Password

2. Ubuntu Change Password from Command Line

Change your account password using the passwd command as shown below. Following example changes the password of the current logged-in user.
ramesh@ramesh-desktop:~$ passwd
Changing password for ramesh.
(current) UNIX password:
Enter new UNIX password:
Retype new UNIX password:
passwd: password updated successfully
If you want to change password for another Ubuntu user, use the following method. Following example changes the password of user jsmith, from user ramesh.
ramesh@ramesh-desktop:~$ sudo passwd jsmith
Enter new UNIX password:
Retype new UNIX password:
passwd: password updated successfully

Reset Your Forgotten Ubuntu Password in 2 Minutes or Less

Reset Your Forgotten Ubuntu Password 


in 2 Minutes or Less


If you’ve ever forgotten your password, you aren’t alone… it’s probably one of the most common tech support problems I’ve encountered over the years. Luckily if you are using Ubuntu they made it incredibly easy to reset your password.
image 
All it takes is adjusting the boot parameters slightly and typing a command or two, but we’ll walk you through it.
Reset Your Ubuntu Password
Reboot your computer, and then as soon as you see the GRUB Loading screen, make sure to hit the ESC key so that you can get to the menu.
image
Root Shell – Easy Method
If you have the option, you can choose the “recovery mode” item on the menu, usually found right below your default kernel option.
image[3]
Then choose “Drop to root shell prompt” from this menu.
image[6]
This should give you a root shell prompt.
Alternate Root Shell Method 
If you don’t have the recovery mode option, this is the alternate way to manually edit the grub options to allow for a root shell.
First you’ll want to make sure to choose the regular boot kernel that you use (typically just the default one), and then use the “e” key to choose to edit that boot option.
image 
Now just hit the down arrow key over to the “kernel” option, and then use the “e” key to switch to edit mode for the kernel option.
image
You’ll first be presented with a screen that looks very similar to this one:
image
You’ll want to remove the “ro quiet splash” part with the backspace key, and then add this onto the end:
rw init=/bin/bash
image 
Once you hit enter after adjusting the kernel line, you’ll need to use the B key to choose to boot with that option.
image 
At this point the system should boot up very quickly to a command prompt.
Changing the Actual Password
You can use the following command to reset your password:
passwd <username>
For example my username being geek I used this command:
passwd geek
image
After changing your password, use the following commands to reboot your system. (The sync command makes sure to write out data to the disk before rebooting)
sync
reboot –f
I found that the –f parameter was necessary to get the reboot command to work for some reason. You could always hardware reset instead, but make sure to use the sync command first.
And now you should be able to login without any issues.

Complete Guide On How To Install Kali Linux In Virtual Machine

Complete Guide On How To Install Kali Linux In VMware Player


This tutorial will walk you through the difficult process of installing Kali Linux in VMware Player, a free virtual machine manager that can be downloaded from www.vmware.com.
This tutorial assumes that you have some basic knowledge of your computer (amount of RAM, number of processors, etc.) and that you’re using VMware Player as a virtual machine manager, not VMware Workstation or other software.

Step One:

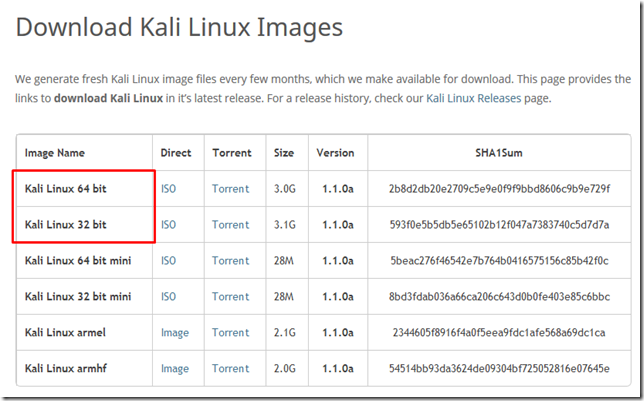
First we need to download Kali from http://kali.org/downloads/. If you have a 64-bit capable computer (like me), then you probably will want the 64-bit version of Kali for performance reasons. 
Expand the drop down menu’s to find the version you need. Select the 64-bit version ONLY if you have a 64-bit computer.

Screenshot_2

Step Two:
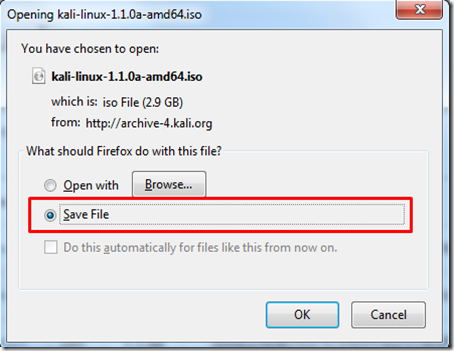
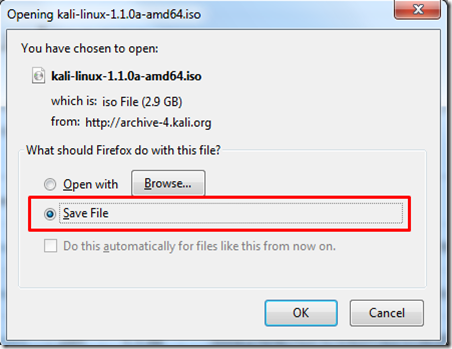
If you don’t have a torrent program, then click on “ISO” next to the appropriate version of Kali and select “Save” when the download notification appears in your browser and save it to a easy to remember location.
Step 2

If you do have a torrent program, then I highly recommend using the torrent option, as it is much faster. Click on “Torrent” next to the appropriate version of Kali and Save the “.torrent” file to an easy to remember/access location.
Step 2
Now open your Torrent program (I use uTorrent), click “Add new torrent,” select the “.torrent” file, and select the appropriate options to download it.
Step 2.6

Now wait for Kali to download, this might take several hours, depending on your internet speed.
Step Three:
When Kali has finished downloading, open VMware Player and click Create a new virtual machine.

step 3

Step Four: 

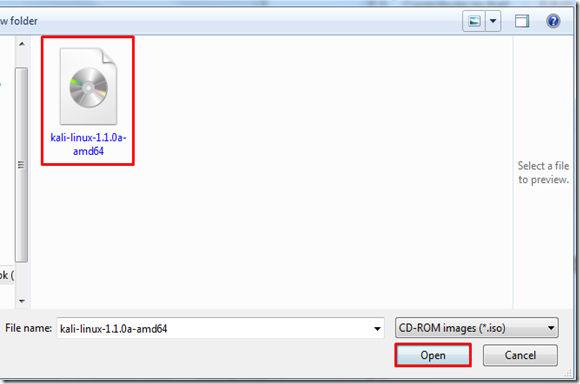
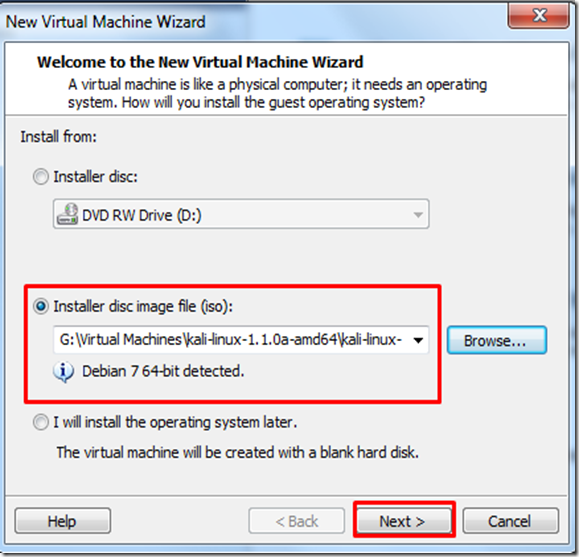
In the window that opens, select Installer disc image file (iso), browse to the location of and select the Kali Linux ISO file that you just downloaded.

step 4

Once you have selected the file, click Next.
3
3.5

Step Five:

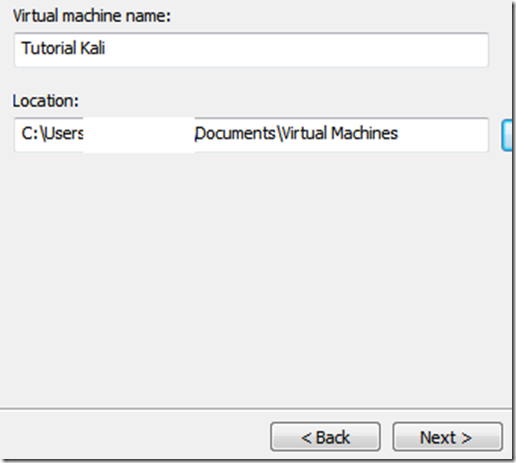
In the next step, select a name for the virtual machine. I’m going to name it Tutorial Kalifor this tutorial. You also need to select a location for it, I recommend creating a folder called “Virtual machines” in My Documents. Then click Next.
step 5

Step Six:

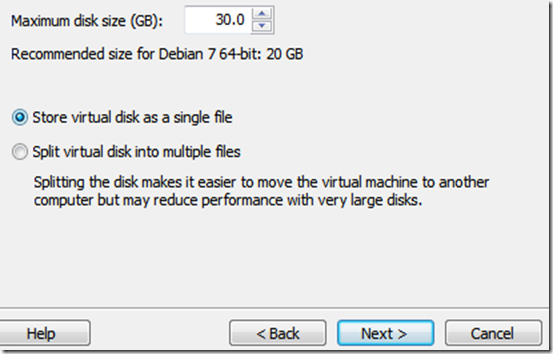
Next step, you need to select a maximum size for Kali. I recommend doing at least 30 GB’s as Kali tends to expand over time. After you’ve entered your desired value (no less than 20 GB) change the next option to Store virtual disk as a single file and click Next
step 6

Step Seven:

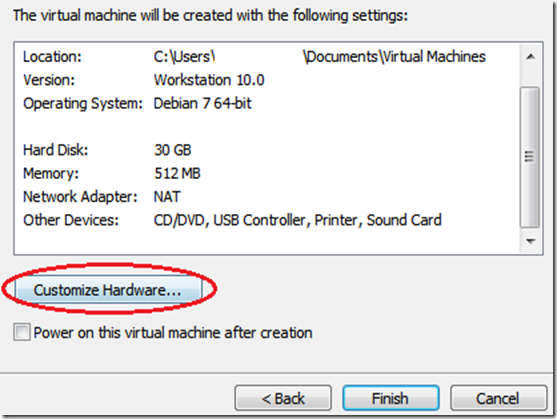
In the next window, we need to customize some hardware settings, so click on theCustomize Hardware… button.
step 7

Step Eight:

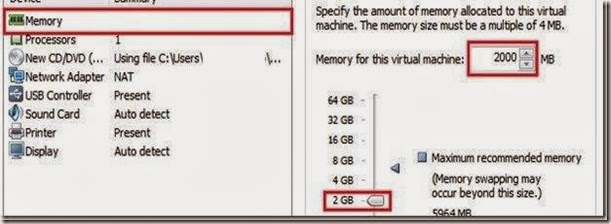
You will now be presented with a Hardware window. Select Memory in the left pane of the window, and slide the slider on the right side to at least 512 MB*. Since I have 8 GB of RAM on my computer, I’m going to put it at 2 GB’s (2000 Mb’s).
*Note, you should give a virtual machine a maximum of half the RAM installed on your computer. If your computer has 4 GB of RAM, then the max you want to slide it to is 2 GB. If your computer has 8 GB, then you can go to a max of 4 GB, etc. 
step 8

Now highlight Processors in the left pane. This option really depends on your computer, if you have multiple processors, then you can select two or more. If you have a regular computer, with two or less, then I suggest leaving this number at one.
step 8.1

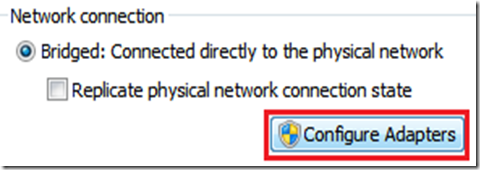
Moving on, click on Network Adapter in the left pane. On the right side, move the dot to the Bridged (top) option. Now click on the Configure Adapters button.
8.2

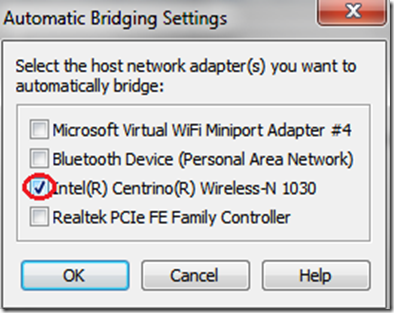
In the small window that pops up, uncheck all the boxes except for the one next to your regular network adapter and hit OK.

8.4

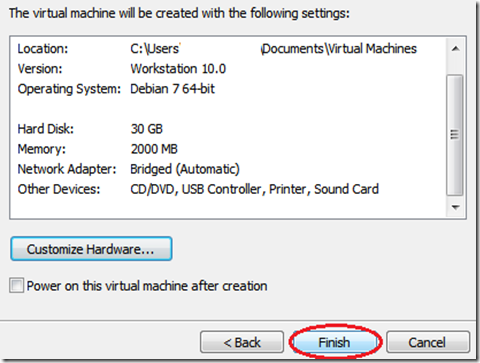
You can now click on Close at the bottom of the Hardware window and then click onFinish in the Wizard.
step 8.5

Step Nine

After you click Finish the window will close and the new virtual machine file will be added to the VM library. Now all we have to do is start Kali and install it! To do this, highlight the name of the newly created virtual machine by clicking on it, and click Play virtual machinein the right pane.
step 9

This will start Kali for the first time.

Step 10:

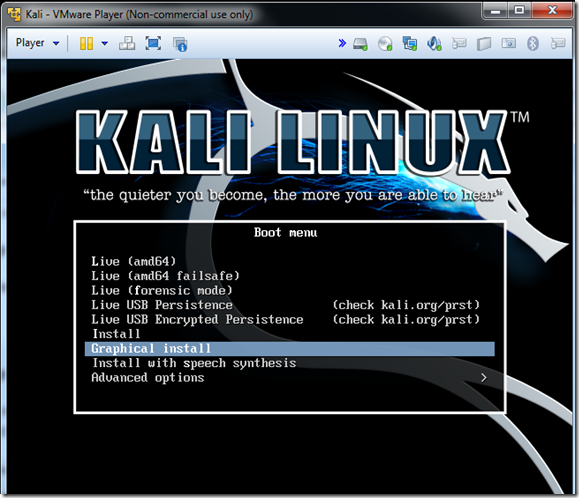
At the boot menu, use the arrow keys to scroll down to Graphical install and hit enter.
4

Step 11:

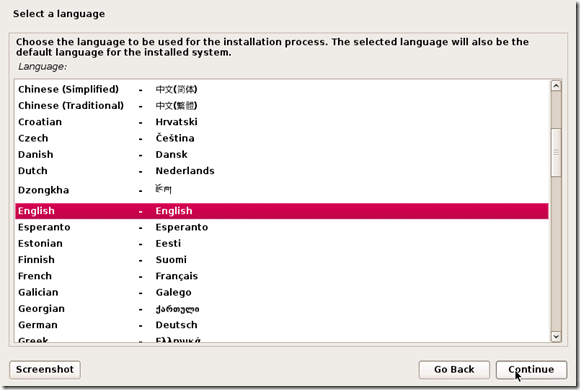
The next screen will ask you to select your preferred language, you can use the mouse to select this, then click Continue.
step 11

Step 12

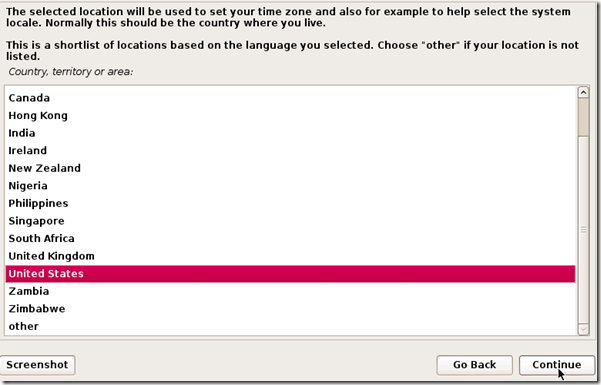
On the next screen, select your location and hit Continue.
step 12

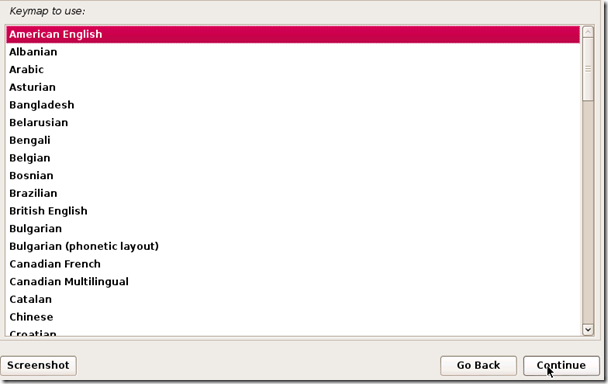
It’ll now ask you for your standard keymap. If you use the standard American English keyboard, then just click Continue.
step 13

Step 14:

Wait until Kali finishes detecting the hardware on your computer. During this, you might be presented with this screen:

step 14

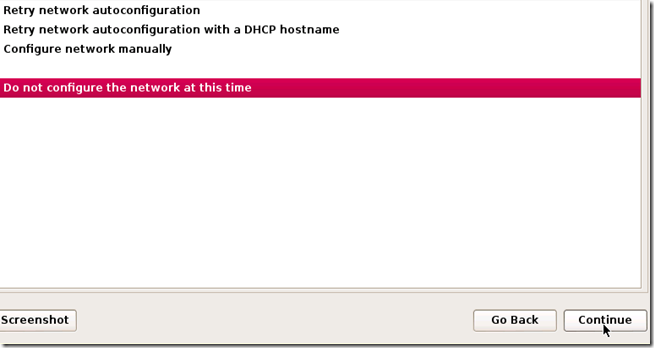
Just hit Continue and select Do not configure the network at this time on the next screen.
step 14.5

Step 15:

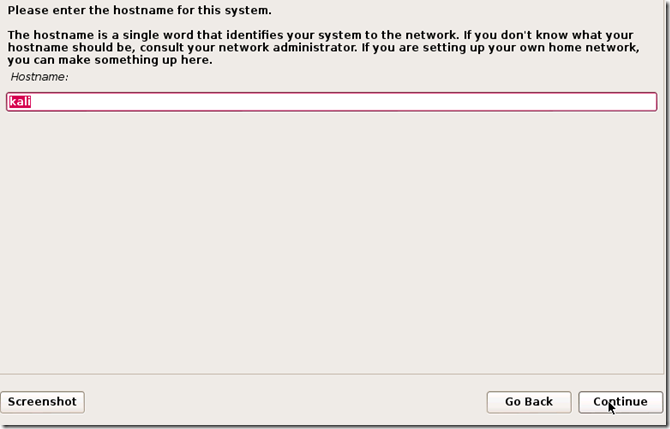
You will now be asked to supply a hostname, which is kind of like a computer name. You can enter anything you want, or you can just leave it as kali. When you’re done, hitContinue.

step 15

Step 16:

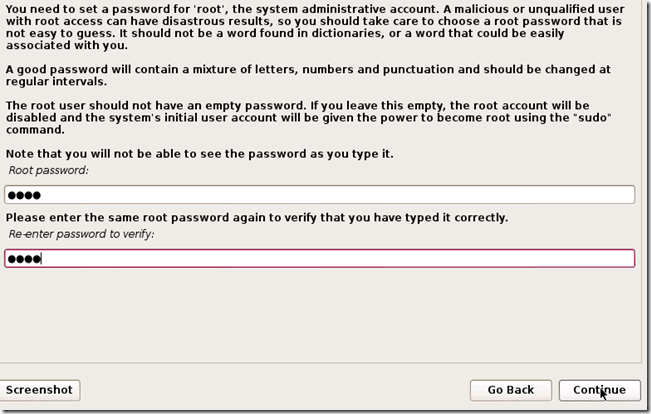
Kali will now ask you to enter a password for the root (main) account. Make sure you can easily remember this password, if you forget it, you’ll have to reinstall Kali. Hit Continueafter you’ve enter and re-entered the password of your choice.
step 16

Step 17:

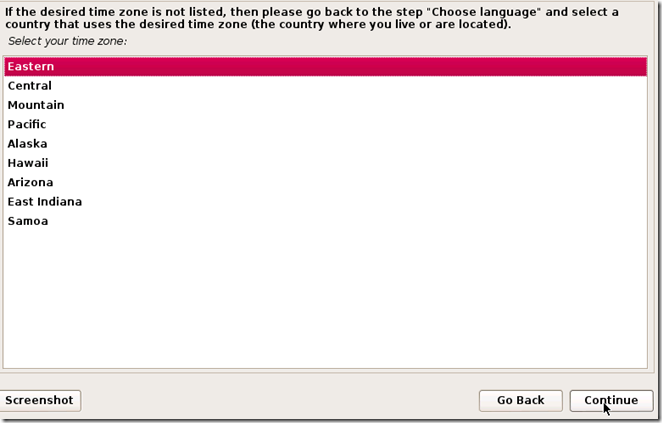
The next step will ask you for your time zone, select it and click Continue.
step 17

Step 18:

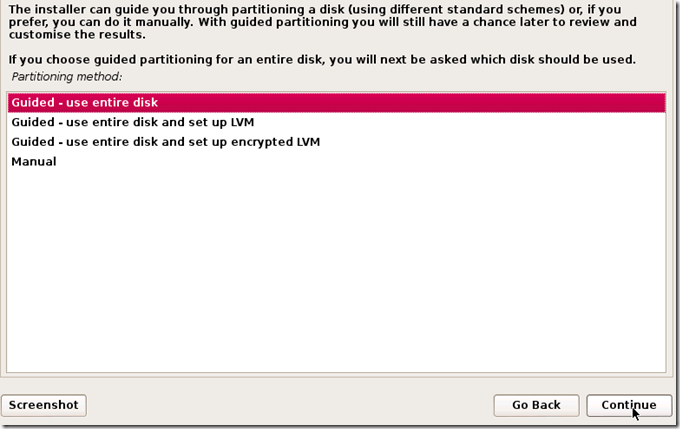
Wait until Kali detects the disk partitions. When you are presented with the next step, selectGuided – use entire disk. (this is usually the top option) then click Continue.
step 18

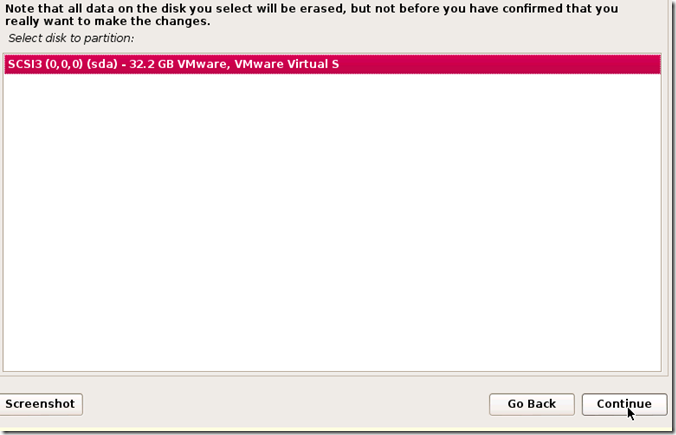
The installer will now confirm that you want to use this partition. Hit Continue.
step 18.5

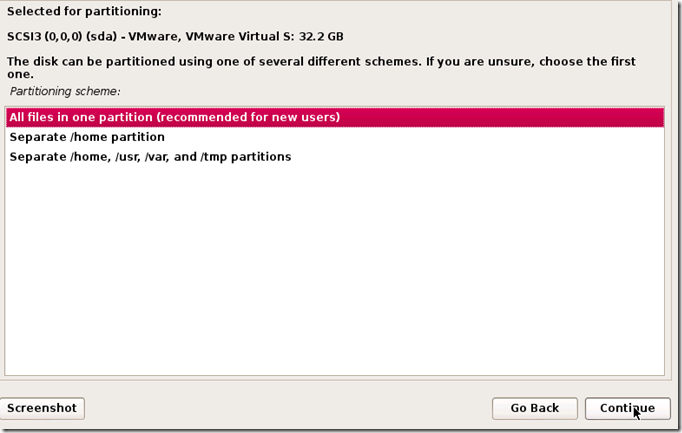
One more question about the partition will appear. Select the option that says All files in one partition and hit Continue.
step 18.9

Step 19:

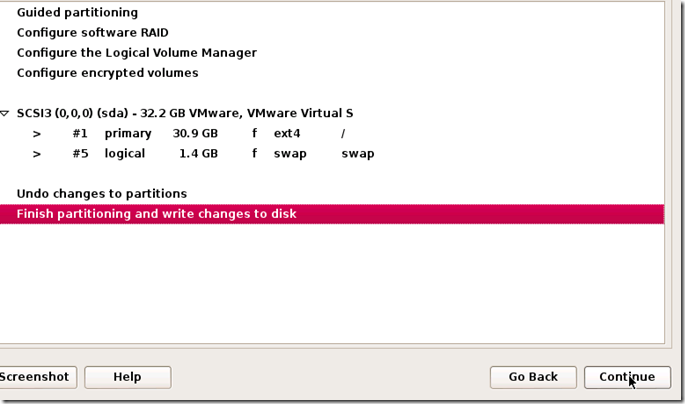
Confirm that you want to make these changes by selecting Finish partitioning and write changes to disk. Then hit Continue.
step 19

Step 20:

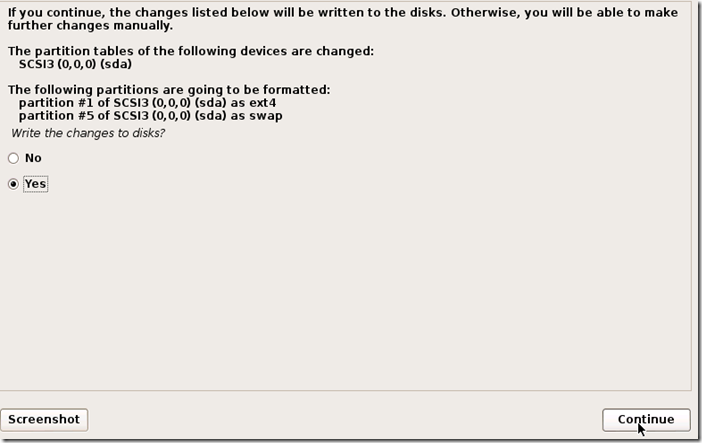
The last question! Confirm that you really want to make these changes by moving the dot to Yes and hitting Continue.

step 20

Kali will now start installing! Wait until it has completed, this might take upwards of 30 minutes.


Step 21:

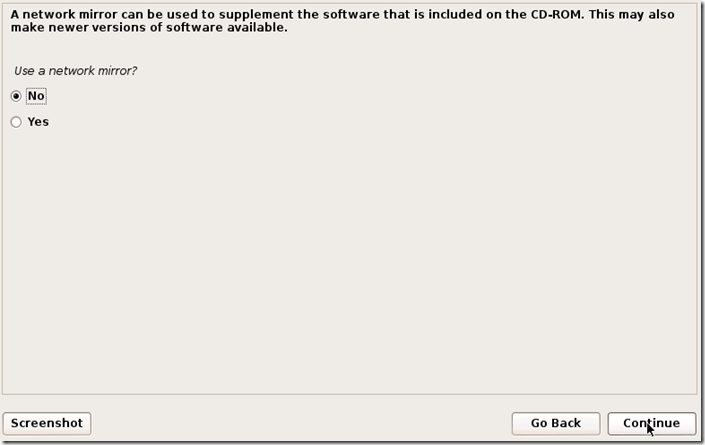
Alright, Kali has finished installing and now you are presented with a window that asks you about a network mirror. You can just select No and hit Continue.
step 21

Step 22:

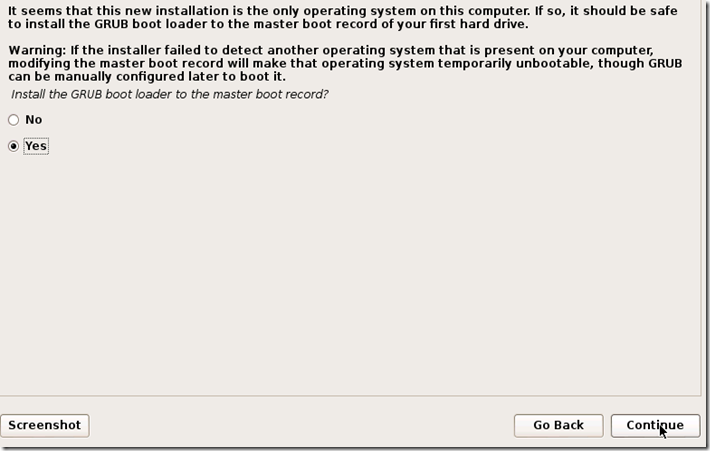
After a few minutes, the installer will ask you if you want to install GRUB boot loader. ClickYes and Continue.
step 22

Step 23:

The installation should now complete, and you’ll be shown with the following notification message:

step 23
Click Continue.

Step 24:

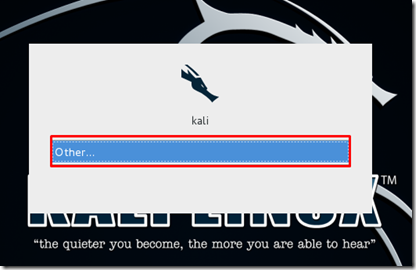
After it restarts, and you’re shown with the “login” screen, click on “Other…”
Screenshot_1
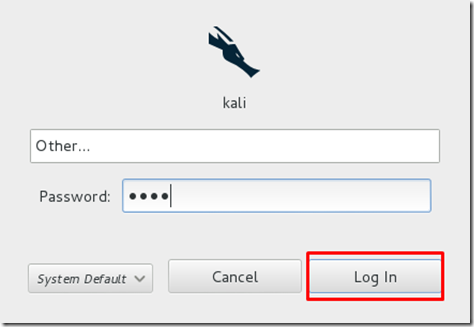
Type the username root in the box and press Enter or click “Log In,”
Screenshot_2
On the next screen, type the password that you created earlier, and press Enter or click “Log In” again.
Screenshot_3
Kali should login, and you’re done!


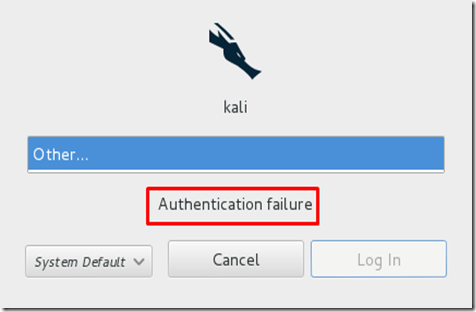
If you type the password/username incorrectly, you’ll get this message:
Screenshot_4
Just try again, and remember to use the password that you created earlier.


You’ve successfully installed Kali Linux in VMware!
You can delete that massive ISO file that you downloaded as well, it isn’t necessary any more. To get the most functionalityfunctioality out of Kali Linux, I recommend installing VMware Tools. Follow my tutorial on how to do that.