Saturday, 30 July 2022
Wednesday, 20 July 2022
How to embed YouTube videos into your Blogspot blog / Add youtube videos to blog
Upload method below :
If you have video content saved in your computer you can easily upload it to your Blogger posts. Simply open the post editor, click on the video icon and select Upload from computer. You can either drag and drop or click on 'Choose a video to upload' to select a video from your folders.

How to Unlock Bootloader on any Xiaomi Phones - Thunder Tech
STEP 1: Enable USB Debugging and OEM Unlocking
To begin with, you will have to enable USB Debugging as well as OEM Unlocking. The former will be used to make your device get recognized by your PC in the ADB Mode. The latter will allow us to unlock the device’s bootloader. Here are the required instructions to enable both of them:

- Head over to Settings on your Xiaomi device
- Then go to About Phone and tap on the MIUI version 7 times.
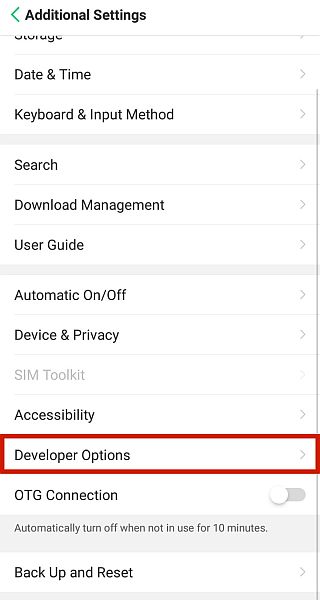
- Then go back to Settings and tap on Additional Settings System.
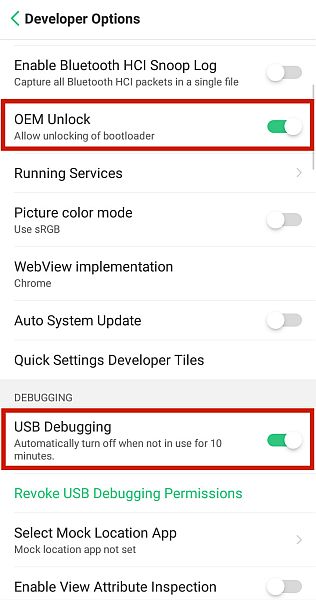
- Within that, head over to Developer Options and enable both the USB Debugging and OEM Unlock toggles.
STEP 2: Bind your Account to your Xiaomi Device
You will now have to bid your Mi Account to your device. For that, you need to have a Mi Account, if you don’t already have one then register and create it right away. When that is done, follow the below steps:

- Go to the Settings page on your Xiaomi device
- Head over to Additional Settings followed by Developer options.
- There you should see the Mi Unlock Status option, tap on it.
- Tap on the Add account and device button situated at the bottom and follow the on-screen instructions. Make sure to enter the same phone number that is currently on your device.
- Once the account is successfully bound, you should get the message that “Added successfully. MI account is associated with this device now”.
After this, you may now proceed ahead and unlock the bootloader on your Xiaomi device.
STEP 3: Boot Xiaomi to Fastboot

- The unlocking process requires your device to be booted to the Fastboot Mode. Follow the below steps to do so:
- Connect your device to PC via USB cable. Make sure Debugging is enabled.
- Head over to the platform-tools folder on your PC. Type in CMD in its address bar and hit Enter. This will launch the Command Prompt.
- Now execute the below command to boot your device to Fastboot Mode:
adb reboot bootloader
- Once that is done, you should see the famous Mi Bunny logo with the Fastboot text. With this, you may now make use of the Mi Unlock Tool and unlock the bootloader on your Xiaomi device. Follow along.
STEP 4: Unlock Xiaomi Bootloader using Mi Flash Tool
- The process will then start and should take a few minutes. Once that is done, you will see the Unlocked Success message. Click on the Reboot phone button to restart your device.
- So go ahead and click on the Unlock button. A confirmation pop up will then appear. Click on the Unlock anyway button. At this point, your device will be wiped as well. So make sure you have taken a backup beforehand.
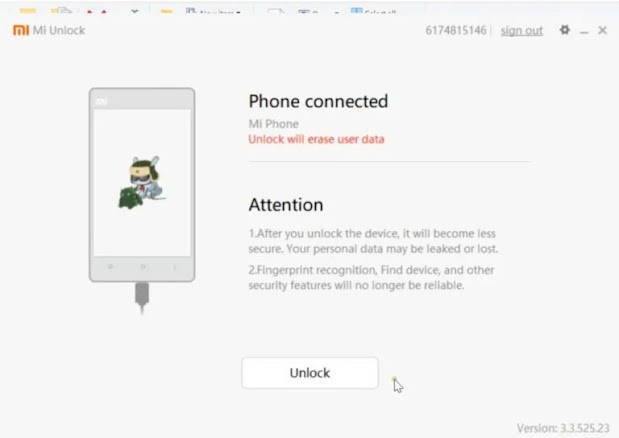
- Launch the Mi Unlock Tool on your PC. Make sure your Xiaomi device booted to Fastboot Mode and connected to PC as well.

- Now sign in with your credentials. The server will then check whether this account is bound to your Xiaomi device or not. Since you have already done so, you should get the Phone Connected message on the tool.


With this, we conclude the guide on how to unlock the bootloader on any Xiaomi device. The first boot might take up some time, which is completely normal. Furthermore, you will also have to set up your device from scratch since a reset has taken place. Apart from that, if you have any other doubts, let us know in the comments section below
🔥2 min ROOT-100% Working Redmi Note 11T 5G / POCO M4 PRO 5G EVERGO with OF Stock recovery Method ⚡ - Thunder Tech
Hello guys ,
100% WORKING 1st sucessfull rooting method for 11T5G , let me know if any doubts
Below are the files required for Rooting RN 11T5G download these :
All GDRIVE links Download 11T5G-STOCK-ThunderTech.img : https://bit.ly/3cH0JoK Download OFboot11T5G-TT.img : https://bit.ly/3OQlSKt Download Magisk-11T5G-TT.apk : https://bit.ly/3zjCAwb Download Magisk-11T5G-TT.zip: https://bit.ly/3oGmMPh
Join our telegram group for queries: https://bit.ly/EVERGO


Run following Commands :-
fastboot devices
fastboot flash boot_a OFboot11T5G-TT.img
fastboot flash boot_b OFboot11T5G-TT.img


Run following Commands :-
fastboot devices
fastboot flash boot_a 11T5G-STOCK-ThunderTech.img
fastboot flash boot_b 11T5G-STOCK-ThunderTech.img


This video was illustrated for Redmi Note 11T 5G .
If you guys have any issues comment below or Incase serious issue DM .
► For Donations : mohanthemass246@axl
Run following Commands :-
fastboot devices
fastboot flash boot_a OFboot11T5G-TT.img
fastboot flash boot_b OFboot11T5G-TT.img
Run following Commands :-
fastboot devices
fastboot flash boot_a 11T5G-STOCK-ThunderTech.img
fastboot flash boot_b 11T5G-STOCK-ThunderTech.img
This video was illustrated for Redmi Note 11T 5G .
If you guys have any issues comment below or Incase serious issue DM .
► For Donations : mohanthemass246@axl
🔥 1 SEC ROOT - 100% Working Redmi Note 11T 5G / POCO M4 PRO 5G with 1 COMMAND root Method ⚡ - Thunder Tech
Hello All ,
100% WORKING sucessfull rooting method for 11T5G
join our telegram group for queries: https://bit.ly/EVERGO
This video was illustrated for Redmi Note 11T 5G .
*USE BELOW FILES ONLY*
If you guys have any issues comment below or Incase serious issue DM .
Below are the files required for Rooting RN 11T5G download these :
All GDRIVE links
Download 11T5G-STOCK-ThunderTech.img : https://bit.ly/3cH0JoK
Download Magisk-11T5G-TT.apk : https://bit.ly/3zjCAwb
Commands :-
fastboot devices
fastboot flash boot_a 11T5G-STOCK-ThunderTech.img
fastboot flash boot_b 11T5G-STOCK-ThunderTech.img
► For Donations : mohanthemass246@axl
🔥5 min fix-100% Working MIUI all Mediatek devices BOOTLOOP - HARD BRICK - SOFTBRICK solution ⚡ Redmi Note 11T 5G / POCO M4 Pro 5G - Thunder Tech
Hello All ,
I have uploaded full TUTORIAL on how to unbrick EVERGO video at the end PROCEDURE , let me know if any doubts
All GDRIVE links Download and install USBDK : https://bit.ly/3Q3l1r0 Download and Install Mediatek drivers : https://bit.ly/3botN42 Download MTKClient : https://bit.ly/3zgLkmY Platform tools : https://bit.ly/3cSZoLO Download and install python : https://bit.ly/3BsylBb Download Xiaomi Fastboot ROM here : https://bit.ly/3vtGDVD
Join our telegram group for queries: https://bit.ly/EVERGO
Run following Commands :-
python setup.py install
pip3 install -r requirements.txt
python mtk w boot_a boot.img
This video was illustrated for all Mediatek devices and tested on Redmi Note 11T 5G .
► For Donations : mohanthemass246@axl
Saturday, 2 July 2022
How To Root Android Phone Step By Step 2022
How To Root Android Phone Step By Step:
You Can Do It!
How To Root Android: Step-By-Step Instructions
Enable USB Debugging
There are certain options in your phone which have to be enabled before you can modify it for rooting. For this process, you need to turn on the USB debug and OEM unlocking options. Follow the steps below.
- Go to your phone’s Settings and find the About Phone setting.

- Scroll down to the bottom of the page, where you will find your phone’s Build Number. Depending on your device model, it could also be called “Version.”
Tap the Version precisely seven (7) times to activate Developer Options for the device. This will reveal other options that allow you to modify your phone enough for rooting purposes.

- Once you’ve enabled Developer Options, you’ll see it under Additional Settings.
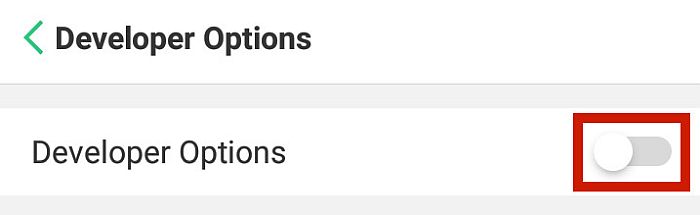
- If required, turn on Developer Options to reveal the hidden options.
- From the menu, look for USB Debugging and OEM Unlocking. Enable these two options by tapping the slider button.
Install Android SDK Platform Tools
Not all rooting methods will need you to connect your Android to your PC.
However, some of the most common Android rooting methods require that you plug in your phone to your PC and run specific commands via your PC.
If your phone needs this particular rooting method, you need Google’s Android Software Development Kit to modify anything in your phone. The SDK is a set of tools that you install on your computer to help you perform some core functions of the process of rooting.
This SDK will be needed later if you use the more technical rooting methods. To successfully download the SDK, follow the instructions below.
- Visit Google’s developer website.

- On the page, you will see several choices. Click the Download SDK Platform-Tools. Click the link of the relevant operating system for which you’re using to download the SDK installer.

- Agree to the terms and conditions.

- Download the SDK tools zip file.

- Extract the zip files to an easily accessible file.

Installing Device Drivers
Your phone needs to communicate with your PC, and to do that, you must have the proper drivers installed. Your device’s USB drivers will allow it to communicate with your PC, allowing you to input commands from your PC.
Phone drivers will automatically install when you plug your phone into your PC with the right USB cable.
If your phone doesn’t automatically install its drivers, there might be something wrong with it. Nevertheless, you can still manually install your own device’s USB drivers from the manufacturer’s website. Simply search for it on Google.
Phase 2: Installing The Needed Android Tools
In this stage, you’re finally going to download the necessary components for rooting your Android phone.
Setting Up ADB & Fastboot Tool
ADB stands for Android Debug Bridge, and it’s sort of the command line you use to communicate with your USB Debug-enabled Android device. The concept can sound incredibly technical, but thankfully, the execution is simple enough.
All you need is the previously-downloaded Android SDK Platform Tools. Once you have that saved on your PC, you need to set up the ADB files and make sure it’s compatible with your phone.
Before you begin, make sure that your phone already has developer options, USB Debugging, and OEM unlocking enabled. Lastly, keep in mind that this tutorial is for Windows devices.
- Go to the folder where you extracted the SDK files.

- Once you’re in that directory, hold Shift and right-click. You should see the following options.

- Click the Open Command Prompt option in the pop-up window. It can also appear as “Open PowerShell In This Window,” just like in the previous example.
You should see what looks like a command window on your PC screen, like this:

- Connect your phone to your computer with its USB cable.
- Enter the following code to the command prompt on your PC: “\/adb devices” then hit Enter.

- Sometimes, you will see a prompt asking you if you would like to allow USB debugging. Allow this prompt. The final response should display your device’s serial number like this:

Flashing TWRP Recovery
TWRP Recovery is a third-party recovery image. Simply put, your phone has a recovery mode that allows you to access the phone’s inner workings easily, much like recovery mode on a PC.
However, this won’t let you root your phone. You need a customized recovery mode that will let you do so, which is what TWRP is for.
In this section, you’re going to install, also known as “flash,” TWRP custom image recovery to your device. Flashing means that you’re going to install the file directly, using commands from your PC.
With this in mind, keep your phone plugged into your computer and follow the steps below.
- The first thing you have to do is download the suitable TWRP image of your model from this list.

Do note that if your phone and model don’t have a TWRP image on that list, you won’t be able to root your phone.
- Go to where you downloaded the TWRP image file and move the image file to the one containing the Android SDK Platform.
- Connect your USB debugged and OEM unlocked phone to your PC. A prompt will appear – allow the prompt to enable USB debugging.
- Open a command window on the file with the SDK.
- Type and enter the command: “adb devices”
- On the following line, type and enter the command: “adb reboot bootloader”
- Your phone should then reboot to its bootloader mode. On the same command window on your PC, type and enter: “fastboot flash recovery <TWRP image file name>” (replace this with the exact filename of the TWRP image file you downloaded.)
- Then type: “fastboot boot <TWRP image file name>”
- Your phone should then restart and boot with TWRP completely installed.
You can also refer to the YouTube video below.
SuperSU Root
Once you have TWRP installed, all you need to do is install your rooting client. The SuperSU app will grant you root access over your device, but although you can download it at the Playstore, you can’t root your phone unless you flash it through TWRP.
In this section, we’re going to learn how to flash the SuperSU app to root your device using TWRP.
- First, download SuperSU on your device. On your Android, go to the SuperSU website and tap Download SuperSU.
- The SuperSU app will download to your device. Take note of where the installer file ends up, as you will have to locate it later on.
- When you have downloaded SuperSU, turn off your device.
- Turn off your device and reboot it to the recovery mode, which should be TWRP recovery.
The method to boot to recovery mode varies for every device, but generally, it involves pressing and holding the power button and volume button for five seconds.
- Before you fully root your phone, backup your current device. You can do this by tapping the Backup button on the TWRP menu. Follow the on-screen instructions.
- If the backup is done, tap Install.
- You will be redirected to a file directory where you will locate the SuperSU file you just downloaded.
- Look for the SuperSU file and tap it.
- On the TWRP menu, you will see that you have to swipe to confirm the flash. Swipe to the right to flash the SuperSU file to your Android.
- Your phone will then display the process logs while your device is being rooted. This is normal. The waiting time will vary and you’ll see the progress on the screen.
- Your phone will then reboot, and when your phone turns on, you will see that the phone has been rooted.
For clearer step-by-step instructions, you can also refer to the YouTube tutorial below.
Tools & Apps To Root Your Android Phone
The most reliable way to root your phone is with TWRP and SuperSU. However, the process can be pretty confusing and daunting, especially for beginners.
Thankfully, one of the things that makes Android a great operating system is the open community that surrounds it.
Because of the difficulty of traditional rooting, some developers have created one-click rooting tools that are much easier to use. In the next section, I will go through the best rooting tools for Android.
Dr.Fone Root

Dr.Fone Root is one of the most trusted tools in the market. It covers a wide range of accepted devices, and you can check whether that includes yours in this list.
More than that, it also offers an easy alternative to the TWRP solution. With Dr.Fone Root, all you have to do is click some buttons, and you can root Android phone without PC – all for free! Plus, there’s a lower risk of bricking your phone since you won’t have to touch your phone’s bootloader.
Check out how you can use this app in the instructions below.
- Download the Dr.Fone Root app from their website and install it on your computer.
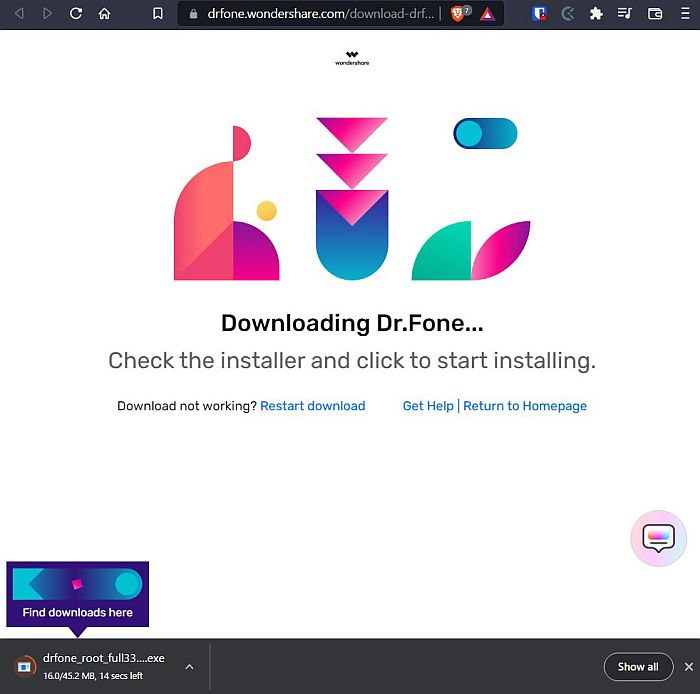

- Make sure the app is open on your computer, and then connect your Android to your PC with your USB cable.
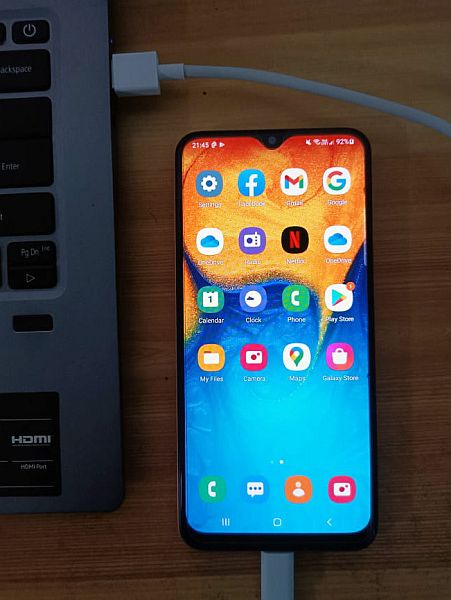
- Wait for your device to be detected.

- Make sure USB Debugging and OEM Unlocking are enabled.

- Wait for the app to check your device’s status.
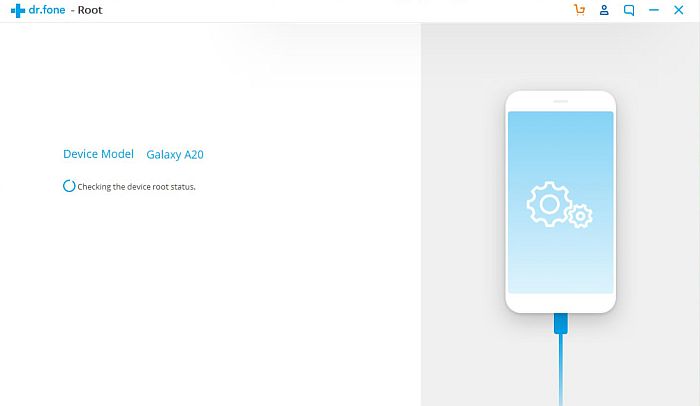
- Once recognized, the app will then scan your phone for compatibility. It might take a few minutes, but you will see a Start button once the phone is ready. Click this to begin the root process.

- The app will then root your device. Wait for the process to finish.

- Once it does, it means that your phone has been successfully rooted.

You can also take a look at this video if you’re having a hard time following the instructions.
Root Master
Root Master is another alternative rooting system that allows you to root your device with just one tap.
It’s available in two versions: PC and mobile.
If you want to know how to root an Android phone with PC, it’s actually pretty straightforward with Root Master. You just have to install the file on your PC, attach your device, and then root via the PC.
On the other hand, the mobile version only requires installing the APK file and then running the root from the phone itself.
Since the mobile phone method is more convenient, as well as relatively safer since you don’t have to access the bootloader, that’s what I’m going to discuss below.
- The first thing you need to do is download the Root Master .apk file from their website.
- Install Root Master to your device. If this is the first time installing from outside of the Google Playstore, you need to enable the phone to install non-Playstore apps first by disabling Play Protect.
- Play Protect will try to block Root Master from installing but confirm it anyway. This should successfully install it on your device.
- Open the Root Master app and tap Root.
- Wait for the rooting process to continue. If your device is compatible, it will finish shortly, and your phone will be rooted.
You can also refer to the YouTube tutorial below for a visual guide of the steps.
In the video, the tester downloaded the .apk file to the PC first and then transferred it to their device by USB. There is no difference between downloading it to your device directly and downloading it through your PC.
iRoot
iRoot is another one-click rooting solution that allows you to easily root your phone compared to traditional methods.
It has comprehensive brand coverage, including Google, HTC, and Samsung devices. Using one-tap rooting methods will also help you avoid bricking your devices because you won’t directly access your device’s bootloader.
- First, download the iRoot tool from their website and install it on your phone.
- If you haven’t done so already, you will need to enable downloading from a different source than Google Play. Simply enable this download in the pop-up prompt.
- Next, install the application. Once again, Play Protect will block the application’s installation due to security reasons. When prompted, tap Install Anyway under Details to authorize the installation.
- Wait for the installation to finish and open the app.
- Agree with the terms and conditions for usage.
- On the app’s main interface, tap the Get Root Permission button on the center of the screen.
- Wait for the rooting process to finish. iRoot will notify you when the root access ends.
- You can then install a root checker application to check for root.
You can also see the complete tutorial from the YouTube video below.
Magisk
Along with SuperSU, Magisk remains one of the most popular and reliable rooting methods.

Just like SuperSU, Magisk is also flashed into your system using a custom recovery image, like TWRP, if it is compatible with your device.
Now that you know how to root your phone with SuperSU, rooting it with Magisk is also easy. Follow the instructions below:
- Download the Magisk app. Make sure you are downloading the latest version for maximum functionality. Also, remember the location where you want to save the Magisk file – you will need to navigate to it later.
- With the Magisk zip file successfully downloaded, reboot your phone into its custom recovery mode, which should be TWRP or something similar.
- Tap Install.
- Locate the downloaded Magisk zip file and tap.
- If you are using TWRP, swipe to confirm flashing.
- Your phone will then reboot, and when it turns on again, it means the rooting process has been successful.
There is also a step-by-step YouTube tutorial on installing Magisk below if you want to see the actual installation process. The custom recovery used there is Orange Fox, but the process is the same as TWRP.
SuperSu Root
SuperSU Root is one of the most reliable methods of rooting around. However, it’s also one of the most complex.

Installing SuperSU will need access to both a mobile device and a PC. The mobile device will need to have developer options enabled and OEM unlocked.
On the PC, you need to download ADB software to communicate with your device. You will then need to link your device to your PC, unlock your device’s fastboot, install TWRP or some other custom recovery, and then flash SuperSU to your Android.
The entire process is documented in the Installing The Needed Android Tools section. You can also follow the YouTube tutorial below if you want a visual guide.
Hope you enjoyed !
Subscribe to:
Posts (Atom)