Here I will be sharing How to HACK and How to be SAFE from getting hacked.
Do share your Hacking tricks too ... ;)
The Tutorials And Softwares I am uploading Is Strictly for Educational Purpose only .. Nothing Is Impossible .
Changing an Administrators password with Guest Account:
Step 1: Instructions
Open Command prompt/MS-DOS, (it's in accessories or you can go to run, type cmd)
Type this:
net user
net user "Any Username" * Note: Make sure to spell exactly what the username is.....nah
For Example : net user Username Newpassword
Type the new password, the text you type is not going to come up on the screen but its there.
It will ask you to confirm....do so
Step 2: That's it!
There you have it! A changed password.
Troubleshoot: If the time is not correct on your compy, this will not work, not sure why.
I first did this when my brother changed me to a limited account and he became the only administrator.
Thanks for reading
Please leave comments!
Change Your Forgotten Windows Password with the Linux System Rescue CD
Resetting Windows Password and Windows Password Recovery
So far in our series we’ve covered how to reset your Windows password with the Ultimate Boot CD, but if you are a little more technical you might want to simply use the excellent System Rescue CD, which is based on Linux.
Note that if you are using standard Windows encryption for your files, resetting the password will permanently disable access to those files. In that case you should crack the password, which is something we’ll cover in an upcoming article.
If you are an Ubuntu user and forgot your password, we’ve covered how to do that as well, either theeasy way with the grub menuor alternately with thelive cd.
Creating the System Rescue CD
Before you can do anything else, you’ll need to download a copy of the System Rescue CD and burn the ISO image to disc. For this task, I prefer the simple ImgBurn utility, but you are free to use whatever burning application you prefer instead.
If you are using ImgBurn, click the Write image file to disc button…
Click the File button near Source and then pick the ISO file, then click the Burn button near the bottom. That’s about all there is to it.
Now that you have your boot CD, you’ll want to boot from it, which will take you to this very informative prompt, with some basic instructions on how to use the CD.
The first thing we’ll want to do is mount the hard drive, using this command. (Note that you might not need to use the –o force argument, it’s only really for when the system didn’t shut down correctly)
ntfs-3g /dev/sda1 /mnt/windows –o force
You can use the df –m command to verify that the drive has been mounted and that it’s the right drive. Note that it’s mounted on /mnt/windows at this point.
Now you’ll want to change directory into the Windows/System32/config directory inside of your windows installation. For mine, the full path was something like this, but it might be different on yours:
cd /mnt/windows/Windows/System32/config
Once you are in that directory, you should see that there is a SAM file, which is where we’ll want to change the passwords.
To change the password we’ll use the chntpw command, and it’s most useful to use the –l argument first to list out all the usernames in the file.
chntpw –l SAM
Now you can add the –u argument with your username, which will end up being something like this command, except you’ll want to replace geek with your username:
chntpw –u geek SAM
This will present you with a wizard type screen:
I’m going to assume that you want to set a new password, so just type “2” at the prompt, add in your password, and remember to use the “y” key when prompted to save.
At this point your password has been changed, so you can issue the reboot command to restart the computer (should take the disc out of the drive)
And now you should be able to login with the new password:
Note that I tested this technique on both XP, Vista and Windows 7 with good results.
Network administrators have many tasks, and auditing the network is at the top of the heap. This isn't a problem if you have a small network. But what happens when that network outgrows your ability to simply walk around and manually make note of what is up/down, what OS a device is running, or what ports are open? When this happens you need to make use of one of thede factostandard open source network auditing tools — Zenmap.
The Zenmap tool is actually a graphical front end for the very popular Nmap command line tool. Nmap is an open source tool for network security and auditing. Although Nmap is incredibly powerful, when working with larger networks most administrators do not want to work with command line only tools. And besides, as they say "A picture is worth a thousand words". In this case that is very much true because Zenmap will give you an interactive graphical map of your network.
Installation
Installation of Zenmap is simple (you will need to also have Nmap installed). You will find both of these tools in your Add/Remove Software tool. Just mark Zenmap for installation and your package manager will pick up the Nmap requirement automatically.
Once installed you will find the tool in Applications > Network. There is a catch with the startup of Zenmap. Because Nmap requires some administrative access to use certain functionalities, you will want to launch Zenmap from the command line like so:
sudo zenmap
Or by first su'ing to the root user (type su and then type the root user password). When the graphical window opens you are ready to start your audit.
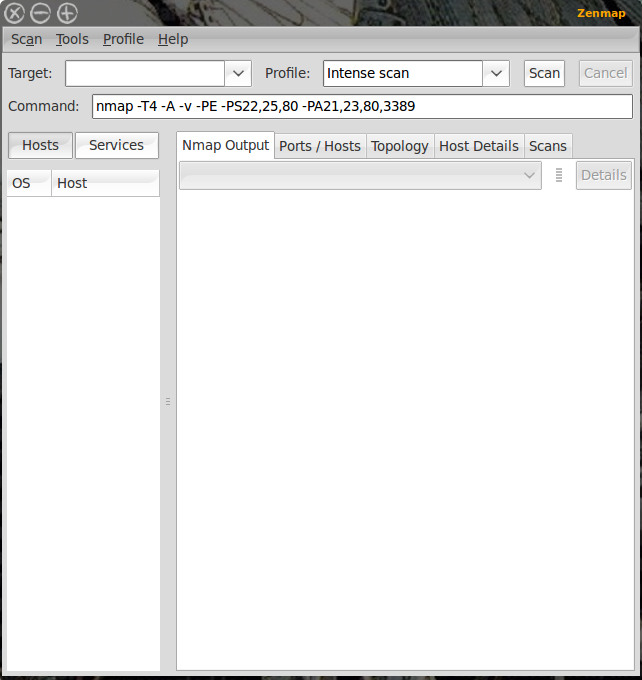
When the Zenmap window opens (see Figure 1) you will see a fairly straight-forward user interface. Let's take a look at what is necessary to start an audit of your network.
The first thing you will need is a target. Let's say, for example, you want to audit a network that is on the 192.168.100.1 IP address scheme. If you want to scan your entire network you could enter 192.168.1.* in the Target section. That will scan every possible address on that network.
The next step is to select a profile. The Profile drop down is filled with pre-configured scan types that range from simple ping scans to intense scans. I will warn you — I have seen intense scans cripple smaller network hardware. If you are dealing with consumer-grade hardware (switches and routers), intense scans can completely bottleneck your network.
When you select the profile you want you will notice the Command section changes to reflect your choices. You could also enter this same command at a bash prompt and get results!
After your profile is selected click the Scan button and the scan will begin. What happens then is all discovered addresses will begin filling up the left pane and the output of the scan will fill up the right pane. Note: Let the scan complete before you click on a different tab or you run the risk of canceling your scan.
You will also notice there are other tabs in the right pane. Each of these tabs serves a very distinct purpose:
Nmap Output: This is the default tab and shows the output of the command.
Ports/Hosts: This tab shows you what ports are open on what hosts.
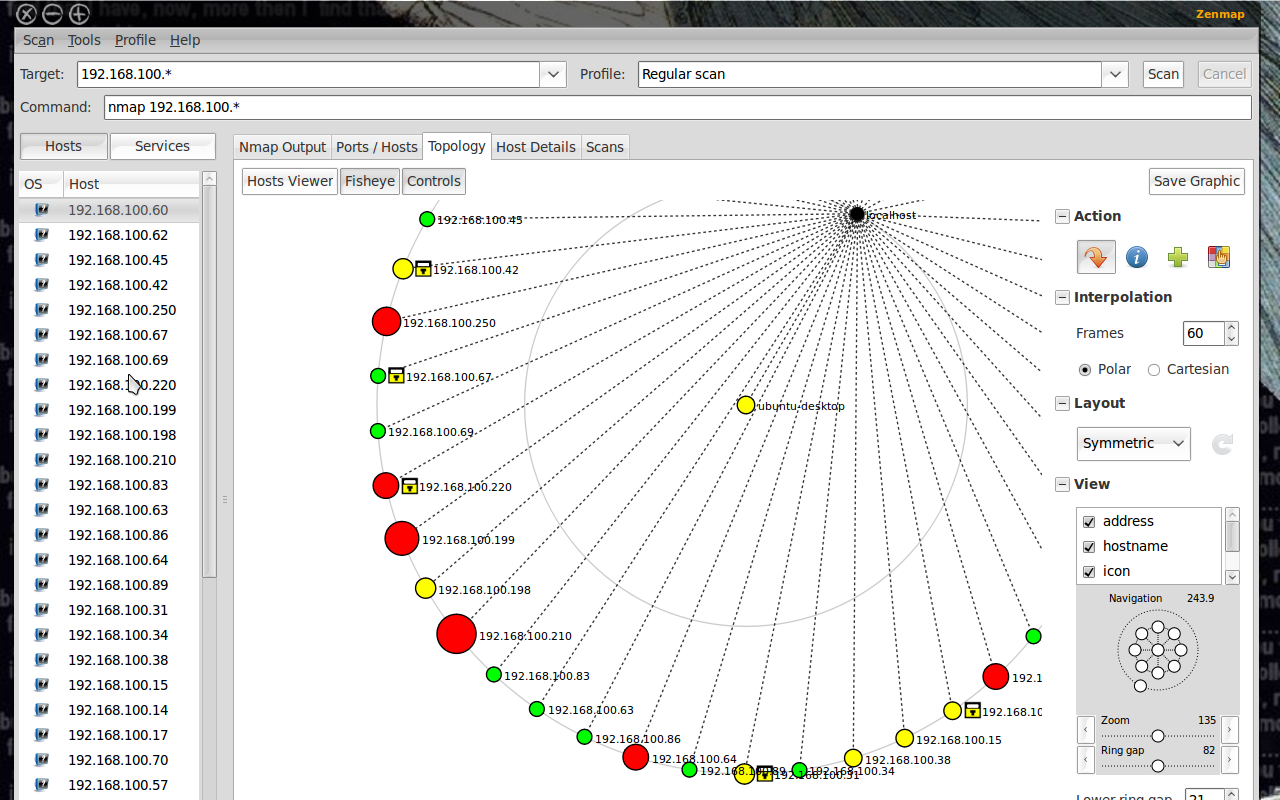
Topology: This tab is a must-use for audits as it shows the actual topology of your network. As you can see (in Figure 2) they layout of your network will be displayed in graphical form.
Host details: This tab will give you specific information about a selected host. To select a host you simply select the desired target from the left pane where all of the IP addresses or host names are listed.
Scans: This tab lists all of the scans you have executed. Most of these will be unsaved scans. You can, of course, select one of your past scans and re-run it by selecting said scan and clicking the Scan button.
Topology
As I mentioned, the Topology tab is going to be one of the more important tools in your audit. When you click on this tab you will see, depending upon the size of your network, a blob of red circles and IP addresses. If your network is large enough this blob will, at first, be worthless. What you have to do is use the Zoom and Ring Gap sliders to zoom in on your network and enlarge the ring gap. By enlarging these numbers the devices on the topology map will expand and the details will begin to show.
As for what type of details you see, you can add/remove various details by expanding the View section (click the "+" sign next to View) and check the details you wish to see. The details available are:
Address
Hostname
Icon
Latency
Ring
Region
Slow In/Out
Of course you can get a much deeper look at a particular host in the Details tab. But for the overall look at your network, this is ideal.
As I mentioned earlier, this map is interactive. What you can do (other than add/remove details and zoom in and out) is select a particular host and make it the focal point of your map. You can also select a point in the Navigation section and move the map around.
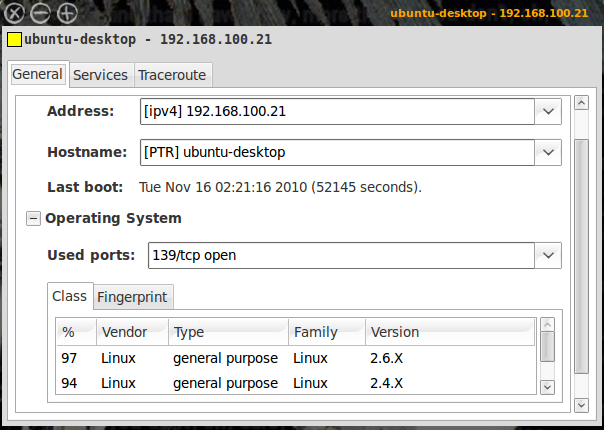
This is very handy when you have a large network and need to focus on one particular section of the network. To get even more details about a particular host, from the topology map, right click the host and a new window will appear (see Figure 3). In this window you will get information according to what you have scanned. In Figure 3 you can see I included OS information in the scan. In order to do that you actually have to edit the scan profile.
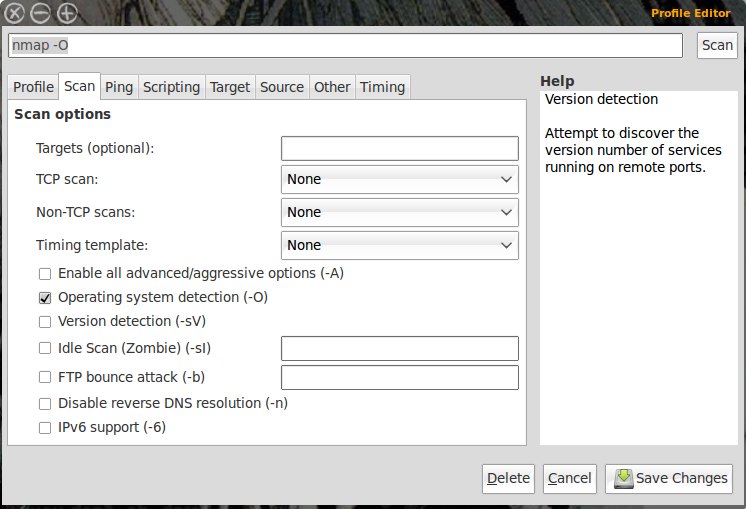
As mentioned, you can use the default scanning profiles, or you can create your own. To do this click Profile and then select either New Profile or Command or Edit Current Profile. If you only want to make a minor change you can select a specific profile and then edit that profile. In my scan above I added Operating System information. To do that select a scan profile and then click Profile > Edit Current Profile. In this new window (see Figure 4) click on the Scan tab and then check the OS option and then click Save Changes to finish up.
If you make a change to a profile you will need to re-run the scan to get the desired results.
Zenmap is a very powerful tool that enables any network administrator to audit any size network. It's a great tool, easy to use, and it's open source! Make sure to dig in deep with the profile editor so you can create helpful scans for your specific network and you will see just how powerful Zenmap can be.
Advanced Port Scanner
What is Advanced Port Scanner?
Advanced Port Scanner is a small, fast, robust and easy-to-use port scanner for Win32 platform. It uses a multithread technique, so on fast machines you can scan ports very fast. Also, it contains descriptions for common ports, and can perform scans on predefined port ranges.
[ROOT] Framaroot, a one-click apk to root some devices
Hi,
Here an one-click application to install Superuser and su binary on phone.
Superuser and su binary include in application work from android 2 to 4.
!! Important !! Success with this application void warranty on your device.
Installation
Download it on your device (links are available at the end of this post)
Install it with a file explorer or directly from your internet browser, if android warn you about security risk, say OK and check Unknown sources to allow install of applications outside of Play Store.
Usage
Open Framaroot and select one of the following action: Install SuperSU, Unroot or Execute script (for advanced users)
Possible case once application is launched
A popup saying "Your device seems not vulnerable to exploit included in Framaroot", in this case you can uninstall app
You seeing one or more exploit name, also click on one after you have selected an action and you will see one of the above messages
Possible case once exploit is selected
"Success ... Superuser and su binary installed. You have to reboot your device"
"Failed ... Exploit work but installation of Superuser and su binary have failed"
"Half-Success :-/ ... system partition is read-only, use local.prop trick. Reboot your device and use adb to see if it run as root", happen when the filesystem in use on system partition is a read only filesystem (ex: squashfs)
"Failed ... Try another exploit if available"
Framaroot crash or freeze, in this case relaunch Framaroot a second time and select the same action and exploit
Release:
Version 1.9.3: Update SuperSU to 1.99r4. Add Czech translation thanks to efIT^cz™. Version 1.9.2: Update SuperSU to 1.94. Fix error #15. Version 1.9.1: New action (Execute script) added which will allow you to execute a custom script. Ukrainian language added thanks to Bogdan. Version 1.9.0: Add Barahir exploit (potentially affect Mediatek based devices). Version 1.8.1: Another attempt to fix crashes. Version 1.8.0: Add Faramir exploit, little brother of Boromir (potentially affect Mediatek based devices). Version 1.7.1: Link to Framaroot donation added (it does nothing as this kind of application are forbidden on play store ... but it could do something someday) Version 1.7.0: Due to a mistake, Pippin exploit didn't appear in exploit list, its fixed now (Huawei device owners welcome). Add Gollum exploit for AMLogic based devices. Version 1.6.1: Remove Superuser as it fail to install. Add execution support from adb command line. Version 1.6.0: Add Pippin exploit (potentially affect Huawei K3V2 based devices) Version 1.5.3: An attempt to fix Gandalf error#10 Version 1.5.2: Revert to exploitation fix included in 1.4.1. Add Slovakian and Italian languages. Error # added in toast message when exploit failed (report the error number in this thread so I could give you the reason of failure). Previously fix for Framaroot crash was a dirty hack, with this version you shouldn't encounter crash. Version 1.5.1: Should fix Framaroot crashes. Version 1.5.0: Add Boromir exploit (potentially affect many Mediatek based devices). Version 1.4.3: Update SuperSU to 1.34. Rewrote the fix include in 1.4.1 for better but slower exploitation. Version 1.4.2: Add Russian and French languages. Add scrollbar for exploit list. Update SuperSU to 1.30 Version 1.4.1: Fix a bug in exploitation due to the different kernel data alignement between version and devices, so if exploits didn't work before it "may" work with this version if your device is vulnerable Version 1.4: Add Gandalf exploit (potentially affect Qualcomm based devices, tested on Nexus 4, as always feedbacks are welcome) Version 1.3: Add Aragorn and Legolas exploits (could affect wide range of samsung devices including non exynos devices, please give feedbacks for your devices. Thanks) Version 1.2.1: Fix unroot bug. Improvements for exploitation. Embed SuperSU 1.25 Version 1.2: Add possibility to Install Superuser, Install SuperSU and Unroot Version 1.1: Frodo exploit added Version 1.0: Initial release
FAQ Is framaroot work on my device ?
If your device is in the compatibility list above, the short answer is : yes but it depends of your firmware version, latest firmware have less chance to be rooted.
If your device is not in the compatibility list and it embed one of the processor mentionned above, the answer is : try it and see.
Why framaroot doesn't root anymore after I update my device ?
Because framaroot exploit security holes present in several devices which has been patched with update you have done, so exploits can't root your device anymore. Framaroot's exploits have a very short life to keep your device "less exposed" to others malicious application. Keep in mind that framaroot is not a permanent rooting application.
I loose root after update, what I can do to root my device now ?
An advice : if you want to have a chance to keep root after update, don't update with Kies or ODIN for samsung devices or don't flash system partition, prefer OTA update and use OTA survival feature in Superuser or SuperSU.
And if you have no choice, you can use the traditional method : flash tools specific to your device
Will framaroot include more exploits ?
Yes, but don't ask when since I don't know myself, it depend of the vendors fix response.
Framaroot crash when I select Gandalf exploit ?
Often the first time you launch Framaroot by selecting Gandalf as exploit, it crash Framaroot. Don't worry, in this case you have to re-launch Framaroot and select Gandalf again, the second time it should work.
What means error# on result ?
All errors less or equal to 9 mean your device is not vulnerable.
If you get error#10, give a try with Framaroot 1.5.3.
All other errors need some investigation about your kernel image.
Framaroot say Success but SuperSU is not installed after reboot ?
Maybe there is some additional protection on your device or something goes wrong with SuperSU version embedded in Framaroot.
In this case, I recommend to use "Execute script" action and put your own shell script commands in /sdcard/custom (use at your own risk, all commands are executed with root privileges). Look at this post to know how to use custom script.
What can I do when the result is Half-success ?
You see this message when the /system partition on your device is a read-only filesystem (eg: SquashFS). To handle this case Framaroot try to use a trick by adding "ro.kernel.qemu=1" in file /data/local.prop. To test if this trick work you have to reboot your device and connect to it with adb shell. Once connected type the "id" command to see if you are root.
If you are not root, your last chance is to select "Execute script" action and put your own shell script commands in /sdcard/custom (use at your own risk, all commands are executed with root privileges). Look at this post to know how to use custom script.
Disclaimer: - This requires a PC. - No CWM needed. - This installs a Chinese root manager rather than superuser or superSU. But I will teach you how to replace it below.
Instruction: 1. Download the rooting application. (This app can root many other devices ) ***mod edit links removed 2. Install the app. This is a Chinese app so I will guide you. Below is a step by step screenshot attached guide. Start the exe you downloaded. Click Next.
Next.
Don't create start menu. (as you wish)
Create desktop icon.
Finish. Uncheck if you dont want to start the rooting app now.
3. Start VROOT and root now! Rooting app started. This will pop-up.
Now connect your device and you it will get detected. (Make sure USB Debugging is turned ON in your device) Click the Green bottom right button and wait for rooting process to be done.
When this shows up, device will reboot, now you can unplug your device.
4. Now we need to install SuperSU from play store to replace the Chinese root manager called 授权管理 1.0.4. 5. Go to play store and install SuperSU. 6. Start SuperSU and you will be asked for permission by 授权管理 1.0.4, choose 允许(means allow). (Should be the right side option.) 7. SuperSU will prompt to install SU binary, go ahead with OK and it will display successful. 8. Now, freeze 授权管理 1.0.4 in titanium backup, just in case you need it again. Note: If you uninstall straight away from app manager, you need to make sure SuperSU updated the binary. 9. Re-run SuperSU to make sure everything is alright. You will be prompt again to install SU binary, just do what it asked. 10. After that, you are rooted with SuperSU and 授权管理 1.0.4 will not be there anymore.
Optional 11. If you want to be more assured, in SuperSU app, prepare for a Reinstall in settings. (NOT Full unroot NOT Switch superuser app) 12. SuperSU will be removed and go back to play store to re-download and install. 13. Start SuperSU and SuperSU will prompt to install SU binary, go ahead with OK and it will display successful. Video Tutorial :




 ... Superuser and su binary installed. You have to reboot your device"
 ... Exploit work but installation of Superuser and su binary have failed"


